Operation
This guide covers day-to-day usage of Blazor Data Orchestrator — managing jobs, monitoring execution, and configuring the platform.

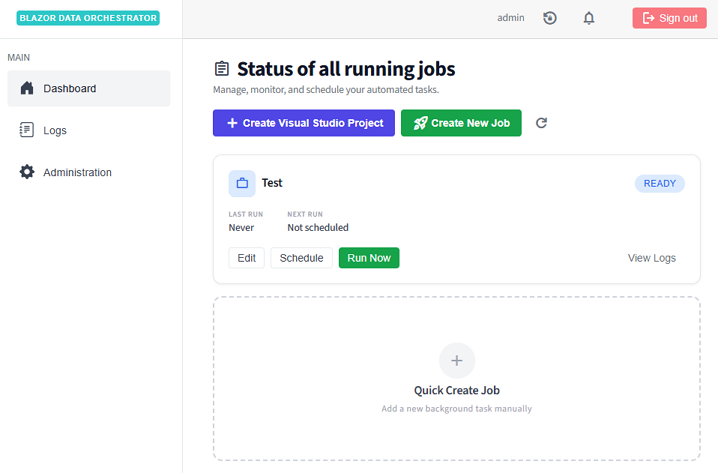
The Dashboard page displays all jobs with key status indicators:
| Column | Description |
|---|---|
| Job Name | Name of the job |
| Enabled | Whether the job is active and eligible for scheduling |
| Queued | Whether the job is currently queued for execution |
| In Process | Whether an agent is currently executing the job |
| Error | Whether the last execution encountered an error |
From the dashboard, you can:
- Click a job row to open the Job Details dialog
- Click Create Job to define a new job
- Use the Run Job Now quick action to trigger immediate execution

- Click Create Job on the home page.
- Fill in the required fields:
- Job Name — A descriptive name for the job
- Job Groups (optional) — The organization this job belongs to
- Click Save to create the job.
The new job is created in a disabled state. You need to upload or write code, configure a schedule, and enable the job before it will execute.
The Job Details dialog is the central management interface for each job. It is organized into tabs:

- Base Job Name — View or edit the job name
- Enabled toggle — Enable or disable the job
- Environment — Set the execution environment
-
Queue — Assign the job to a specific queue (e.g.,
default) - Run Job Now button — Queue the job for immediate execution

Configure one or more schedules for the job:
- Schedule Name — A label for this schedule
- Enabled — Toggle the schedule on/off independently of the job
- Days — Select which days of the week the job should run (Mon–Sun)
-
Start Time / Stop Time — Time window in military format (e.g.,
800to1700) - Run Every N Hours — Interval between runs within the time window
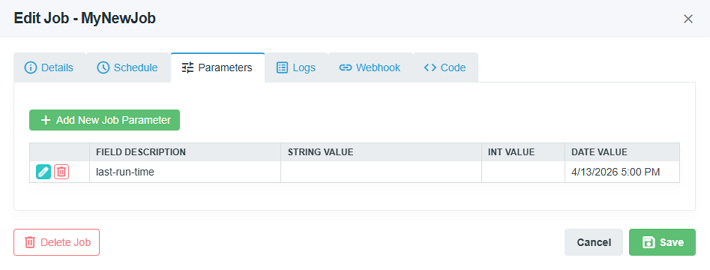
Attach key-value data to the job:
- Field Description — A label describing the parameter
- Value — Supports string, integer, or date values
Parameters are accessible to job code through the execution context.

View execution history and log entries:
- Select a Job Instance from the dropdown to filter logs
- Each log entry shows: Action, Details, Level, and Timestamp
- Timestamps are adjusted by the configured timezone offset
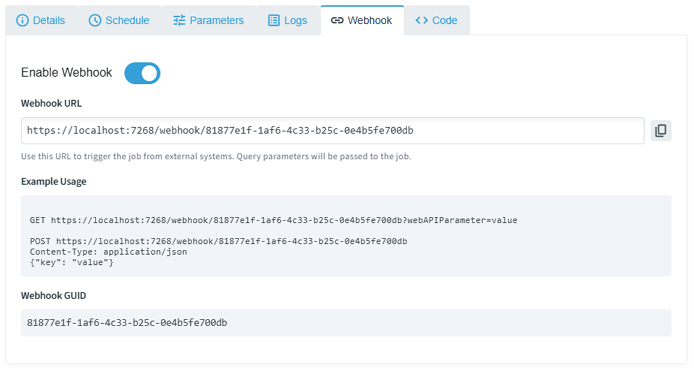
Enable a webhook endpoint for the job:
- Toggle the Webhook Enabled switch
- A unique GUID is generated and displayed as the webhook URL
- External systems can trigger the job via
GETorPOSTto/webhook/{GUID}

Write or upload job code. See the Online guide for detailed editor usage.
There are three ways to trigger job execution:
| Method | Description |
|---|---|
| Scheduled | The Scheduler service evaluates enabled schedules at a configurable interval (default: 60 seconds). When conditions are met, it creates a JobInstance and queues a message. |
| Manual | Click Run Job Now on the Details tab or Code tab. This immediately creates a JobInstance and sends a queue message. |
| Webhook | An external system sends an HTTP request to /webhook/{GUID}. Query parameters are forwarded to the job. |

- Navigate to the Logs tab.
- Log entries are displayed in a table with columns for Action, Details, Level, and Timestamp.
| Status | Meaning |
|---|---|
| Queued | A message has been sent to the Azure Queue but no agent has picked it up yet |
| In Process | An agent has received the message and is executing the job |
| Completed | Execution finished successfully — the instance is marked complete |
| Error | Execution failed or the instance was marked as stuck by the scheduler |
Navigate to the Administration page via the navigation link on the home page.

- Create and manage organizational groups for categorizing jobs.
- Groups have a name and an active/inactive status.
- Assign jobs to groups for easier filtering and management.

- Create and manage queue configurations.
- Each queue has a name (e.g.,
default,jobs-large-container,onprem-queue). - Assign queues to jobs to route their execution to specific agent pools.
- Deploy agents configured with matching
QueueNamesettings to process queue-specific workloads.

- Timezone Offset — Configure the timezone offset (in hours) for log display. This offset is applied to all timestamps shown in the UI.
| Status | Meaning |
|---|---|
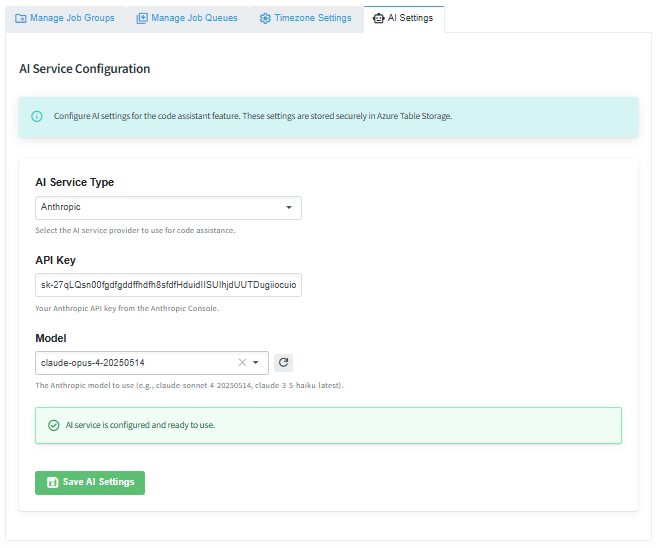
| AI Service Type | Choose the AI provider |
| API Key | Enter the API key supplied by the AI provider |
| Model | Choose the model to use |
The Agent is a background worker service that processes job execution messages. It implements several production reliability patterns — queue-based scaling, NuGet packaging for job distribution, and heartbeat-based reliability for long-running tasks. Here is what happens when a job is executed:
- Poll queue — The agent polls its configured queue every 5 seconds for new messages.
- Receive message — When a message is received, the visibility timeout is set to 5 minutes.
-
Download package — The agent downloads the job's
.nupkgfile from Azure Blob Storage. -
Extract & validate — The package is extracted and validated (checking for
main.cs/main.py,configuration.json, etc.). -
Resolve dependencies — For C# jobs, NuGet dependencies declared in the
.nuspecare resolved usingdotnet restore. -
Load configuration — The appropriate
appsettingsfile is loaded based on the job's environment setting. Connection strings from the agent's configuration are merged in. - Execute code — C# code is compiled and executed via Roslyn/CS-Script. Python code is executed via subprocess.
- Log results — Execution logs are written to Azure Table Storage.
- Update status — The JobInstance record is updated with completion or error status.
- Delete message — On success, the queue message is deleted. On failure, it becomes visible again after the timeout.
For jobs that run longer than 5 minutes, a background task renews the message visibility every 3 minutes. This heartbeat pattern is critical for production reliability:
- It prevents the message from becoming visible to other agents while the job is still running.
- If the agent crashes, the message becomes visible after the timeout, allowing another agent to pick it up — ensuring no job is silently lost.
- Combined with the Scheduler's stuck instance detection (which marks unresponsive instances as errors after a configurable timeout), this provides end-to-end reliability for long-running workloads.
Agents scale horizontally across multiple queues. You can:
- Scale replicas — Deploy multiple replicas of the same agent for parallel processing on a single queue.
-
Create dedicated pools — Deploy separate agents with different
QueueNamevalues to create specialized processing pools (e.g.,defaultfor lightweight jobs,jobs-large-containerfor resource-intensive workloads). - Mix environments — Run cloud-based agents alongside on-premises agents monitoring different queues.
Back to Home