Online
The online code editor allows you to write, compile, and deploy jobs directly in your browser — no local tooling required beyond a web browser. Write a C# or Python job, hit compile, and have it running on Azure in minutes.

The editor is embedded in the Code Tab of the Job Details dialog. It uses the Monaco Editor (the same editor that powers Visual Studio Code) and supports both C# and Python. Combined with the AI Code Assistant, it provides a complete development environment for automation jobs without any local setup.

To create a new job click the Create New Job button.

Give the job a name and click the Save button.

Click the Code tab. The Code tab has two modes:
| Mode | Description |
|---|---|
| Editor | Write and edit code in the Monaco editor |
| Upload | Upload a pre-built .nupkg file. Create this file by saving code created with the Editor or using the Visual Studio project. |
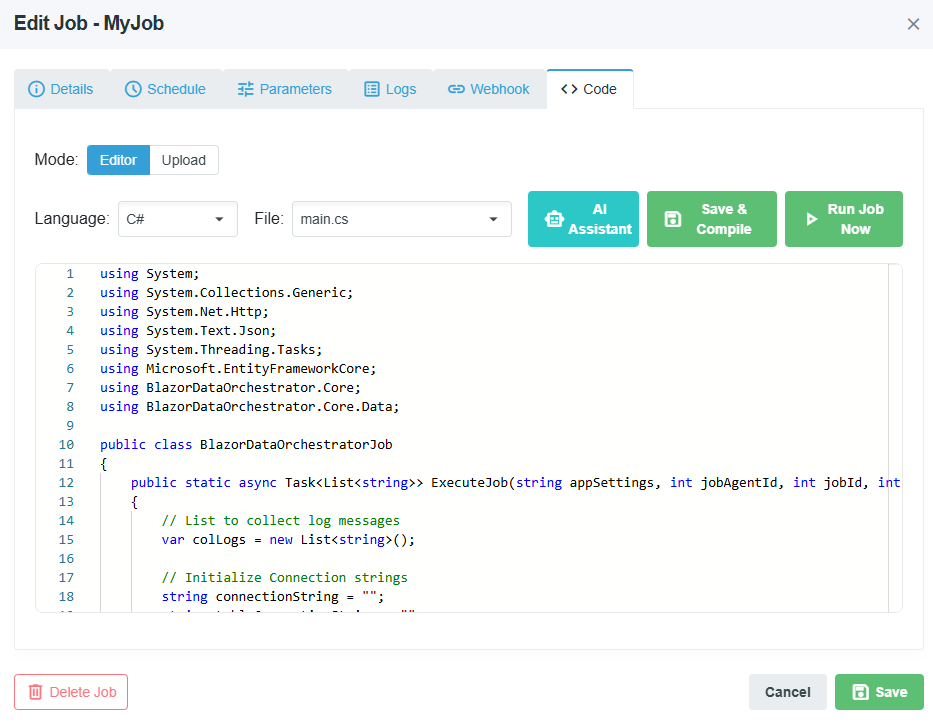
In Editor mode, the Languge dropdown allows you to switch beteen coding in C# or Python. The File dropdown lists all files in the job package. You can switch between files to edit them.
| File | Purpose |
|---|---|
main.cs |
Primary code file with the ExecuteJob() entry point |
appsettings.json |
Default configuration |
appsettingsProduction.json |
Production configuration overrides |
.nuspec |
NuGet package manifest with dependency declarations |
Additional .cs files |
Supplementary code files |
| File | Purpose |
|---|---|
main.py |
Primary code file with the execute_job() entry point |
appsettings.json |
Default configuration |
appsettingsProduction.json |
Production configuration overrides |
Additional .py files |
Supplementary code files |
Click Save & Compile to validate your code and create a deployable package:
- All code files are saved to the in-memory editor file storage.
- NuGet dependencies declared in the
.nuspecare resolved usingdotnet restore. - Code is compiled using the Roslyn compiler.
- If compilation succeeds, a
.nupkgpackage is created and uploaded to Azure Blob Storage. - If compilation fails, an error dialog displays the compiler errors with line numbers and descriptions.
- Code files are saved.
- A syntax check is performed on the Python code.
- If valid, a
.nupkgpackage is created and uploaded. - If invalid, syntax errors are displayed.
In Code Edit mode, you can click Run Job Now to:
- Save and compile the current code
- Package and upload the result
- Create a JobInstance record
- Queue the job for immediate execution by the Agent
This is the fastest way to test changes — edit, run, and view logs all within the browser.
There are two ways to declare NuGet dependencies:
Edit the .nuspec file in the file dropdown and add dependencies:
<dependencies>
    <dependency id="Newtonsoft.Json" version="13.0.3" />
    <dependency id="Dapper" version="2.1.35" />
</dependencies>Add directives at the top of your .cs file:
//css_nuget Newtonsoft.Json
//css_nuget Dapper, 2.1.35
Dependencies are resolved at compilation time. Transitive dependencies (dependencies of dependencies) are included automatically via dotnet restore.
Important: When reopening a job in the editor, dependencies from the
.nuspecfile are reloaded. If you add dependencies only via CS-Script syntax, they are also captured in the.nuspecduring compilation to ensure they persist across editor sessions.

The AI Code Assistant is available in Code Edit mode. Click the AI button in the editor toolbar to open the chat dialog. Note: For best performance use Claude Opus 4.6 or higher as the AI model.
- Context-aware — The AI receives your current editor code, so it understands what you are working on.
- Code suggestions — Ask the AI for help with code logic, debugging, or refactoring.
- Code block application — AI responses containing code blocks include a button to apply the code directly to your editor.
- Streaming — Responses stream in real-time for immediate feedback.
Configure the AI backend through the Administration > Settings page:
| Setting | Description |
|---|---|
| Provider | OpenAI or Azure OpenAI |
| API Key | Your API key for the selected provider |
| Endpoint | Azure OpenAI endpoint URL (Azure OpenAI only) |
| Model | The model to use (e.g., gpt-4, gpt-3.5-turbo) |
- Auto-save — The editor stores your changes in memory. Navigating away from the Code Tab and back preserves unsaved edits within the same session.
- Error resolution — When compilation fails, read the error messages carefully. They include the file name, line number, and a description of the issue.
- Testing locally — For complex jobs, consider using the Visual Studio approach for full debugging support, then upload the package via Code Upload mode.
Back to Job Development · Home