
This app monitors the health of the drive inside your Home Assistant machine — the boot SSD or NVMe that HAOS runs on. It reads SMART data directly from the hardware and reports it to the SMART Sniffer integration as Home Assistant entities: temperature, health status, power-on hours, and more.
No SSH access, no scripts, no external tools. Install the app, install the integration, and your system drive is monitored.
SMART Sniffer has two parts that serve different purposes:
- This repo (smart-sniffer-app) — The HA app that runs a lightweight agent on your HAOS machine. It reads SMART data from the local system drive and includes a Test Lab with simulated drives for development and testing.
- smart-sniffer — The HA integration and standalone agent. The integration turns drive data into HA entities, sensors, and alerts. The standalone agent runs on remote machines (NAS, Proxmox host, workstation, Mac) to monitor their drives over the network.
The app handles your local HAOS drive. For everything else, see the integration repo.
- In Home Assistant, go to Settings → Apps → App Store
- Click the ⋮ menu (top right) → Repositories
- Add this URL:
https://github.com/DAB-LABS/smart-sniffer-app
- Click Add, then close the dialog
- Find SMART Sniffer App in the app store (you may need to refresh)
- Click Install
- Once installed, click Start
- If your drive shows UNSUPPORTED or you see "DRIVE ACCESS BLOCKED" in the logs, turn off Protection Mode — Go to Settings → Apps → SMART Sniffer → Protection mode, switch it OFF, then restart the app (see Security & Permissions for details)
- Install the SMART Sniffer integration via HACS if you haven't already
- Your HAOS drive should be auto-discovered — look for a notification under Settings → Devices & Services prompting you to set up SMART Sniffer
- If auto-discovery doesn't appear, add it manually: Settings → Devices & Services → Add Integration → SMART Sniffer, then enter host
0449a086-smart-sniffer-agentand port9099 - Your system drive will appear as a device with sensors for temperature, health, attention state, and SMART attributes

Raspberry Pi (armv7) — New! We now support Raspberry Pi 2/3/4 (32-bit OS) alongside amd64 and aarch64. This is freshly built and untested in the field — if you're running Home Assistant on a Pi, we'd love your feedback. Open an issue and let us know how it goes.
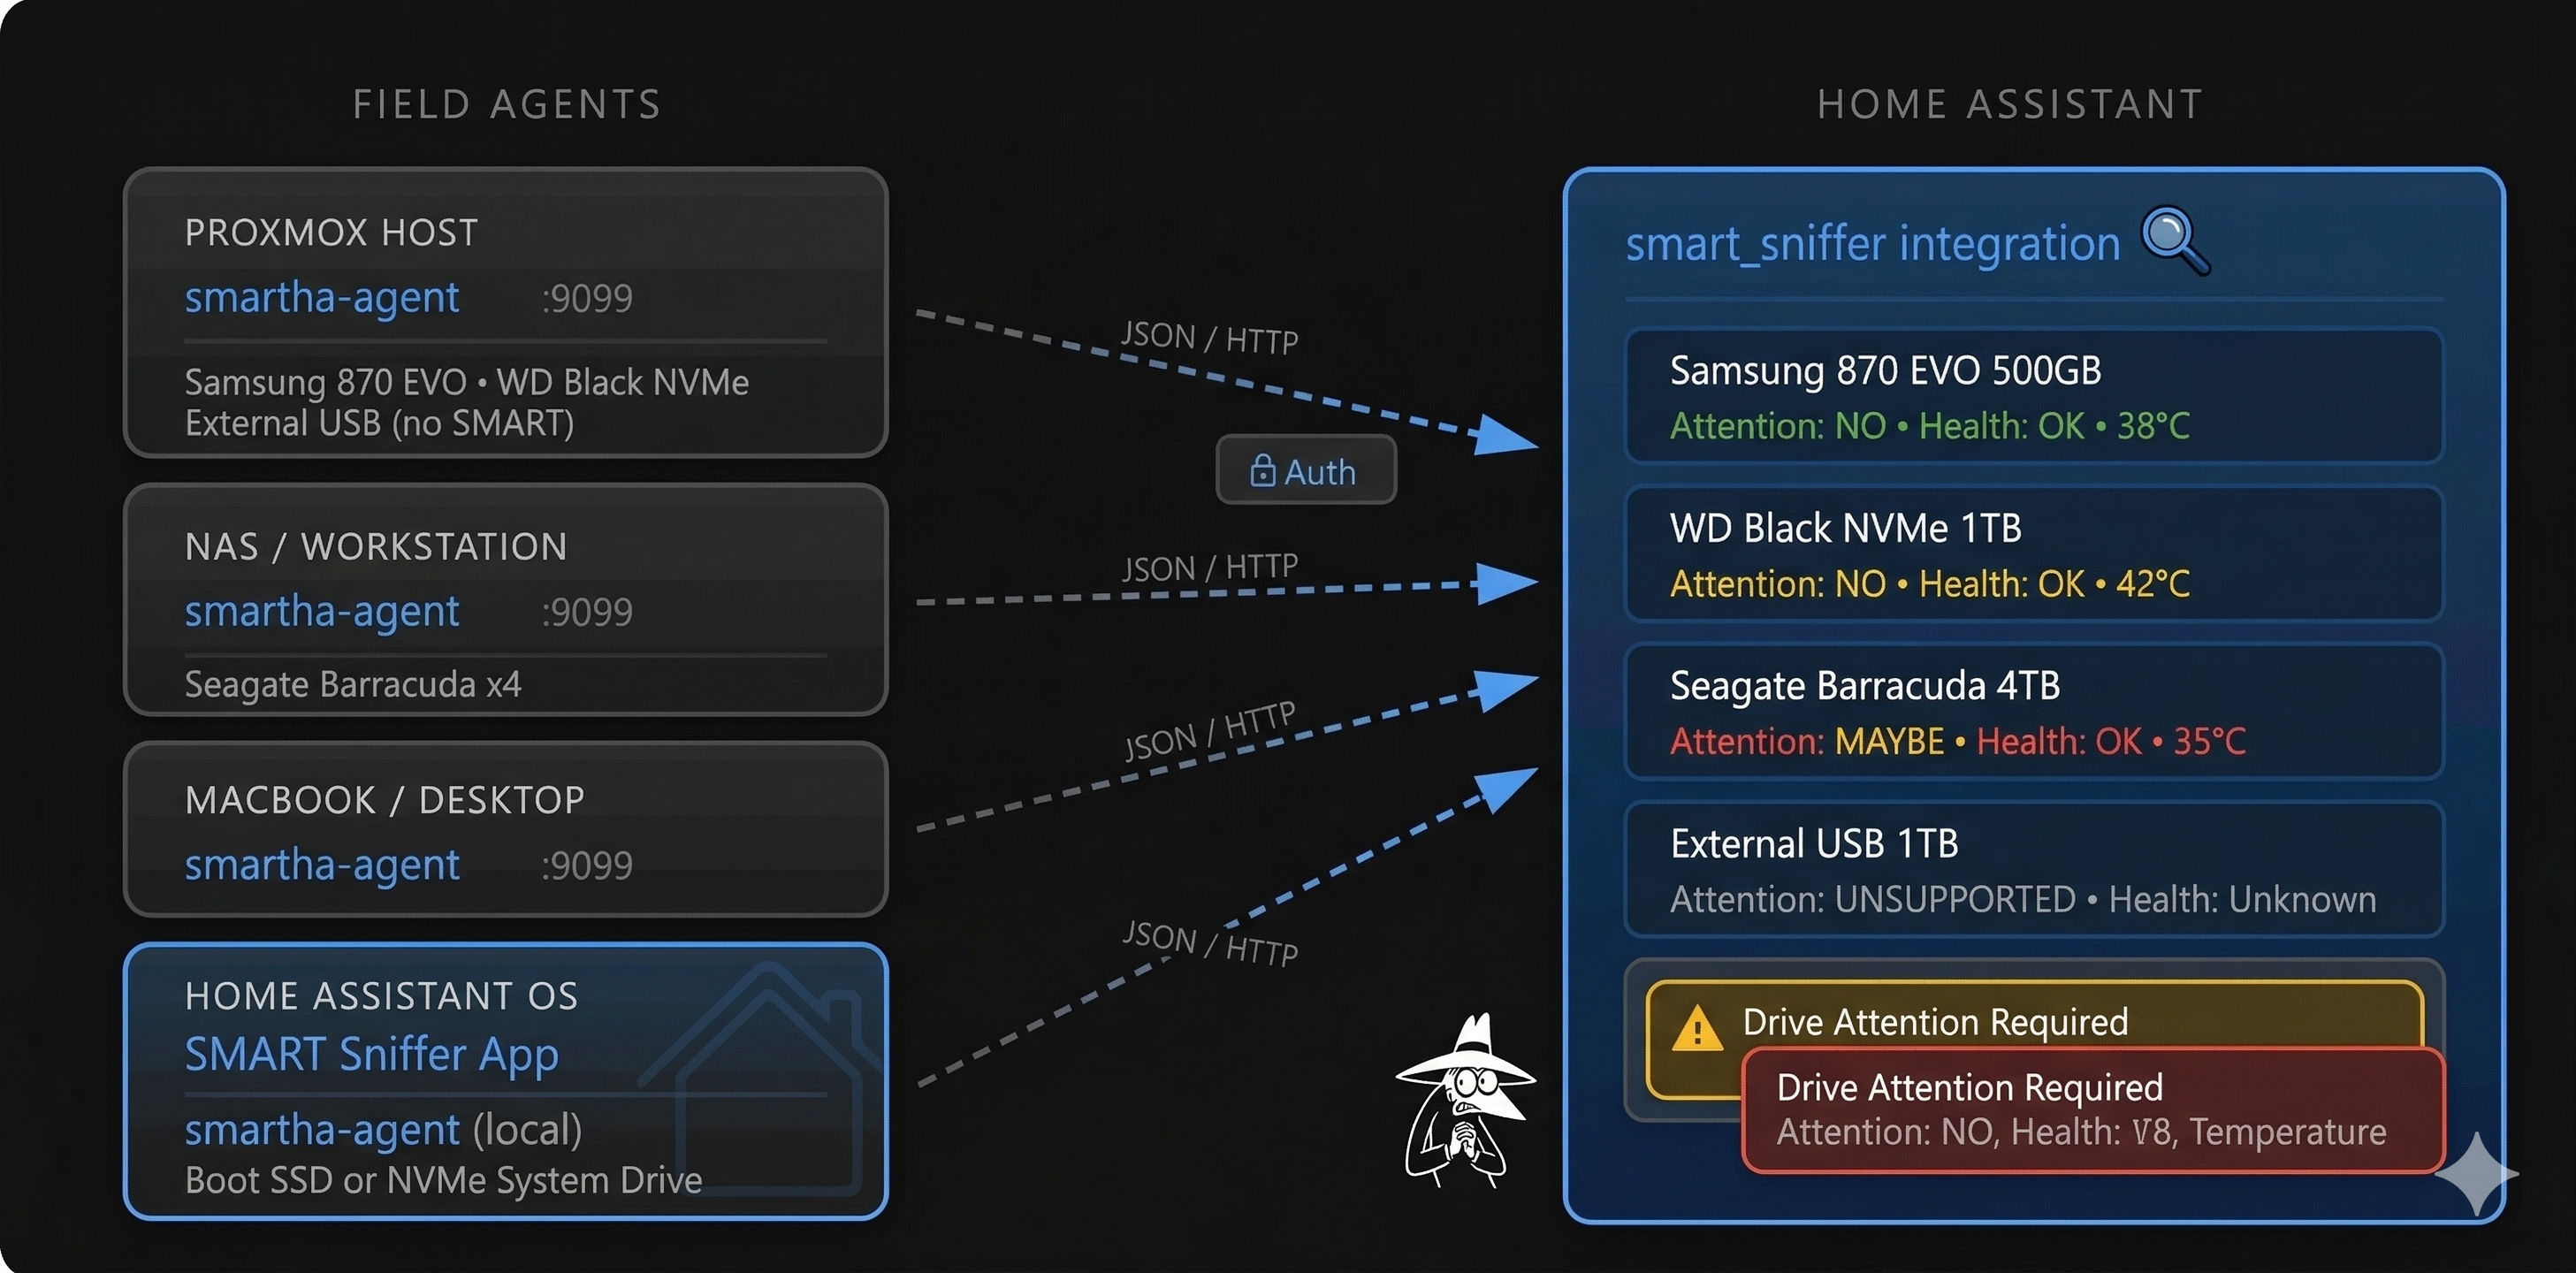
The app runs smartctl inside the HA container to read SMART attributes from the host drive. It exposes the data via a local HTTP API. The SMART Sniffer integration polls this API and creates HA entities — sensors, binary sensors, and diagnostic attributes — that you can use in dashboards, automations, and alerts.
The agent also advertises itself via mDNS (Zeroconf), so the integration can discover it automatically on most networks.

| Option | Default | Description |
|---|---|---|
| Agent Port | 9099 |
Port the agent listens on |
| Bearer Token | (empty) | Optional auth token — must match what you configure in the integration |
| Scan Interval | 60 |
How often SMART data is refreshed (seconds) |
| Enable Mock Test Drives | off |
Launch simulated drives for testing |
| Mock Agent Port | 9100 |
Port for the mock test agent |
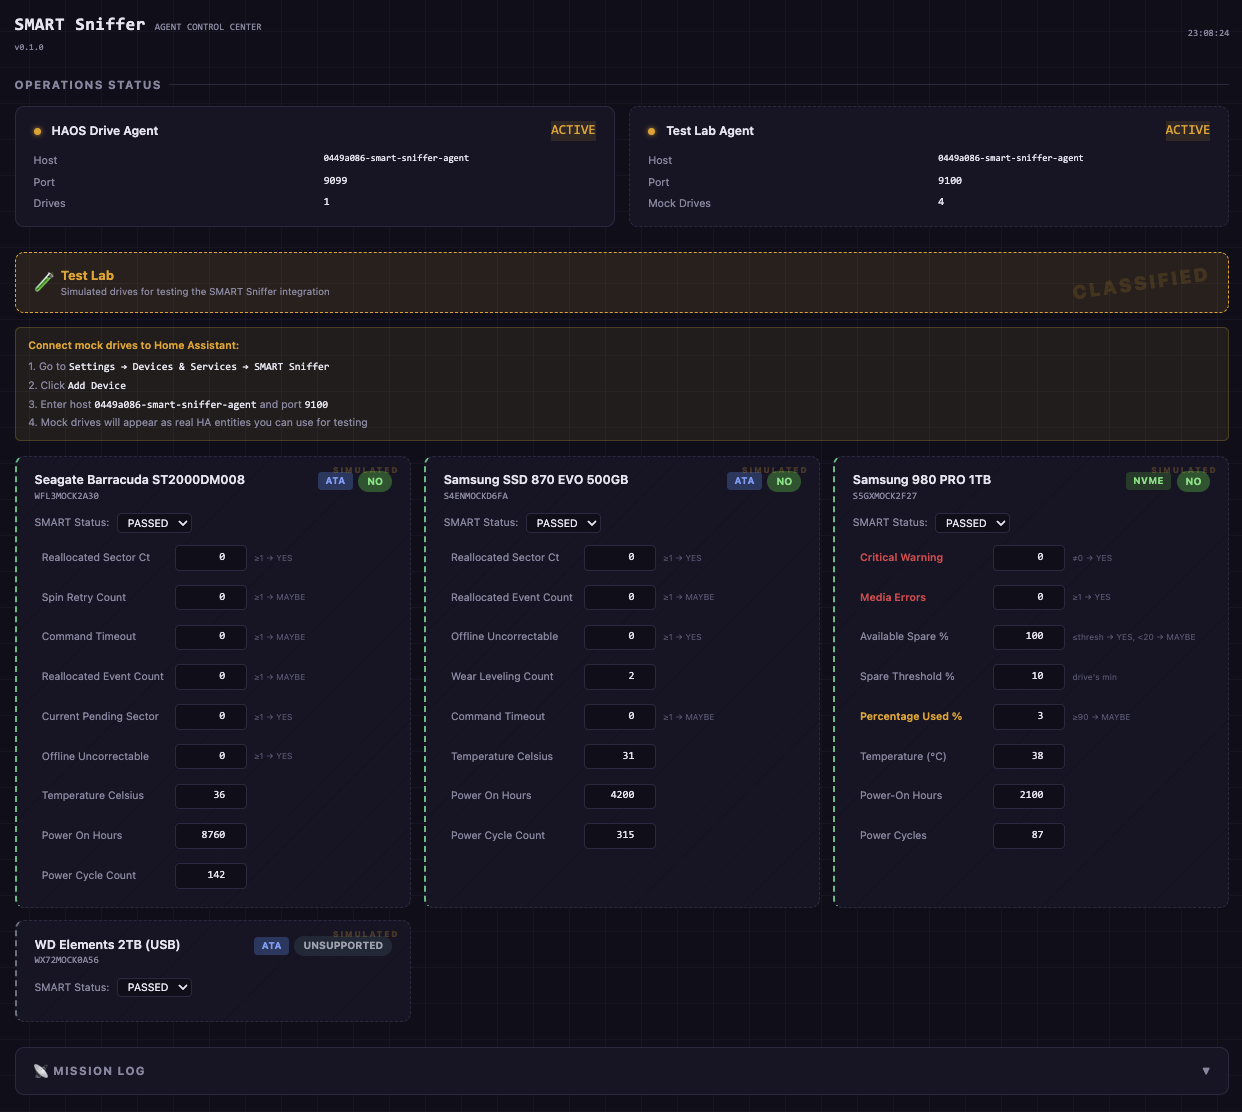
The app includes a built-in Test Lab with simulated drives for safely testing the SMART Sniffer integration without touching real hardware. Enable Mock Test Drives in the app configuration to activate it.
Mock drives behave exactly like real drives from the integration's perspective. You can adjust their SMART attributes in the web UI and watch how the integration responds — attention states, health changes, temperature alerts, and more.
To connect mock drives to Home Assistant, add them as a separate agent in the integration:
- Go to Settings → Devices & Services → SMART Sniffer → Add Device
- Enter host
0449a086-smart-sniffer-agentand port9100
This creates a second connection alongside your real drive — mock drives and real drives are managed independently.
Click Open Web UI in the app sidebar to access the Agent Control Center — a real-time dashboard showing the status of both the local drive agent and the Test Lab. From here you can see agent health, IP addresses, drive counts, and manage mock drive attributes.
SMART Sniffer needs direct hardware access to read drive health data. This is not optional — it's how SMART monitoring works on Linux. Every tool that reads SMART data (smartmontools, hdparm, Scrutiny) requires the same access.
What the app needs and why:
| Permission | Purpose |
|---|---|
SYS_RAWIO |
Send SCSI commands to SATA/SAS drives |
SYS_ADMIN |
Send admin commands to NVMe drives |
full_access |
Open drive device nodes (/dev/sda, /dev/nvme0) |
| Protection Mode OFF | May be needed to allow the above permissions to take effect |
What the app does NOT do:
- Does not write to your drives
- Does not access your network beyond the local HA instance
- Does not send data externally or phone home
- Does not access any files outside its own container
Why you may need to turn off Protection Mode:
On some hardware, Home Assistant's Protection Mode restricts the container from accessing drive device nodes. When this happens, the app can detect your drive exists but cannot read its SMART data — you'll see a "DRIVE ACCESS BLOCKED" warning in the logs and your drive will show as UNSUPPORTED.
If this affects you, go to Settings → Apps → SMART Sniffer, switch Protection Mode OFF, then restart the app.

After disabling Protection Mode, you'll see this warning — that's expected:

Our commitment to transparency:
SMART Sniffer is fully open source. The Go agent, startup scripts, AppArmor profile, and integration code are all published here for anyone to audit. We ship a custom AppArmor security profile that documents exactly what the container accesses. We're committed to requesting only the minimum permissions needed and being upfront about why each one is required.
Drives show "UNSUPPORTED" or no SMART data — Check the app logs for "DRIVE ACCESS BLOCKED". If you see it, turn off Protection Mode (see above) and restart the app.

No drives detected — The app needs SYS_RAWIO to read SMART data from host drives. This is configured automatically. Check the app logs if drives aren't appearing.
Port conflicts — If port 9099 is already in use, change the Agent Port in configuration and update the integration to match.
USB drives showing UNSUPPORTED — Many USB enclosures block SMART passthrough at the hardware level. This is a limitation of the USB bridge chip, not the app.
mDNS not discovered — The app uses your HA hostname (Settings → System → General) to create a unique mDNS name. If you have multiple HA instances, make sure each has a different hostname. If auto-discovery still doesn't work, add the agent manually using host 0449a086-smart-sniffer-agent and port 9099 as described in Step 3 above.