Jenkins is typically run as a standalone application in its own process with the built-in Java servlet container/application.
We'll use the official jenkins/jenkins image to launch Jenkins as a Docker Compose project:
- Quickly review the
docker-compose.yamlfile underjenkins_docker. - To launch a new Jenkins instance:
cd jenkins_docker
docker compose up
Note
The minimum hardware requirements is 4GB of memory and 20GB of disk space, if you don't have it consider deploying your server in an EC2 instance.
- Expose the Jenkins server using Ngrok static domain:
- If haven't done yet, create your Ngrok account, download and install the tool.
- In the main menu of your account page, click Setup and installation. Under Deploy your app online, enable a static domain.
- Expose your Jenkins server by
ngrok http --domain=<my-static-domain> 8080(change<my-static-domain>accordingly).
- Open up your browser and visit the Jenkins server by
https://<my-static-domain>. - Complete the Setup Wizard, as follows:
- Install suggested plugins.
- Choose an easy to remember admin username and password.
Note
Throughout this module you will build, test and deploy the Netflix stack service.
A GitHub webhook is a mechanism that allows GitHub to notify a Jenkins server when changes occur in the repo. When a webhook is configured, GitHub will send a HTTP POST request to a specified URL whenever a specified event, such as a push to the repository, occurs.
- If you don't have it yet, fork both the NetflixFrontend and the NetflixMovieCatalog repos.
- On each GitHub repository page, go to Settings. From there, click Webhooks, then Add webhook.
- In the Payload URL field, type
https://<your-jenkins-ngrok-url>/github-webhook/. In the Content type select:application/jsonand leave the Secret field empty. - Choose the following events to be sent in the webhook:
- Pushes
- Pull requests
- In your NetflixFrontend repository, in branch
main, create a dir namedpipelines, and a file calledbuild.Jenkinsfilein it, as follows:
// pipelines/build.Jenkinsfile

pipeline {
    agent any

    triggers {
        githubPush()
    }

    stages {
        stage('Build app container') {
            steps {
                sh '''
                    # your pipeline commands here....

                    # for example list the files in the pipeline workdir
                    ls

                    # build an image
                    docker build -t netflix-front .
                '''
            }
        }
    }
}
We'll later on discuss the Jenkinsfile structure and syntax.
- Commit and push your changes.
- In your Jenkins server main dashboard page, choose New Item.
- Enter the project name (e.g.
NetflixFrontendBuild), and choose Pipeline, then Ok. - In the opened pipeline configuration page, under Pipeline, definition, choose Pipeline script from SCM.
- Choose Git as your SCM, and enter the repo URL.
- Under Branches to build enter
mainas we want this pipeline to be triggered upon changes in branch main. - Under Script Path write the path to your
pipelines/build.Jenkinsfiledefining this pipeline. - Save the pipeline.
- Test the integration by click Build Now in the pipeline's main page. Note: The pipline is expected to fail, we'll fix it later.
- Once the build is triggered, it will appear in the build history on the bottom left side.
- Click on the build number (e.g.,
#1) to open the build details, Click on Console Output to view the logs and see the details of the build process.
Based on the logs, you can see:
- That Jenkins by default checks out the repo (indicated by
sh 'ls'step as configured in your Jenkinsfile) docker: not foundreveals that Docker is not installed. This is because Jenkins is running inside a container without Docker installed.
We'll make your pipeline working properly soon, let's move on...
Most standard administrative tasks can be performed from the screens in the Manage Jenkins section of the dashboard.
Let's take a look on some of them:
- System: Configure global settings and paths for the Jenkins instance.
- Plugins: Add, update, remove, disable/enable plugins that extend the functionality of Jenkins.
- Nodes and Clouds: Add, remove, control, and monitor the nodes used for the agents on which build jobs run.
- Manage Credentials: Configure the credentials that provide secure access to third-party sites and applications that interact with Jenkins.
- Users: Manage users defined in the Jenkins user database. This is not used if you use a different security realm such as LDAP or AD.
- System Information: Displays information about the Jenkins environment.
- System Log: Jenkins log that contains all java.util.logging output related to Jenkins.
More information can be found here.
The Jenkins community plugins are extensions that enhance the functionality of the Jenkins server.
In the Dashboard page, choose Manage Jenkins, then Plugins. In the Available plugins tab, search and install:
Blue OceanDocker PipelineConfiguration as Code
Jenkins plugin updates are essential for maintaining compatibility, security, and functionality, as they ensure that the latest features and bug fixes are incorporated into the Jenkins ecosystem.
The below screenshot (taken from the top right bar in the main Jenkins dashboard) warns the user regarding available plugin update.
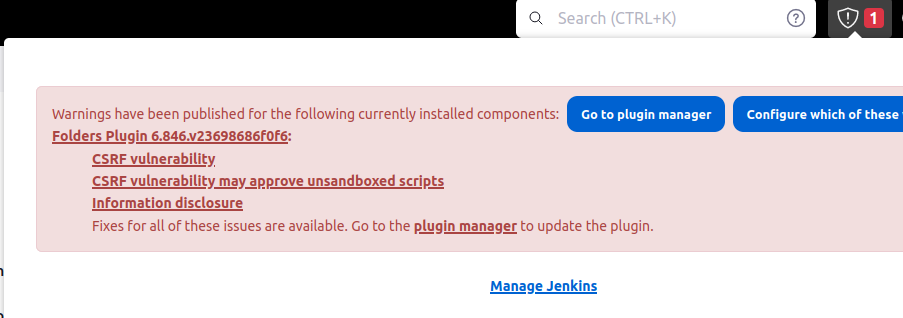
You can also see and perform updates in Manage Jenkins > Plugins.
Note
As your Jenkins server will be used not only during this module, but actually up to the end of course, you are expected to maintenance your server.
Where does Jenkins execute our pipelines?
So far, all pipelines have been executed in the Jenkins server itself (a.k.a Jenkins Controller). But this is far from being optimal.
- Performance: Heavy pipelines can reduce the server performance.
- Build environments: Jenkins may run on Linux, but pipelines might need Windows.
- Isolation: Jobs on the controller risk accessing sensitive data or affecting other jobs.
Jenkins can delegate the jobs execution to other agents, creating a distributed pipelines architecture.
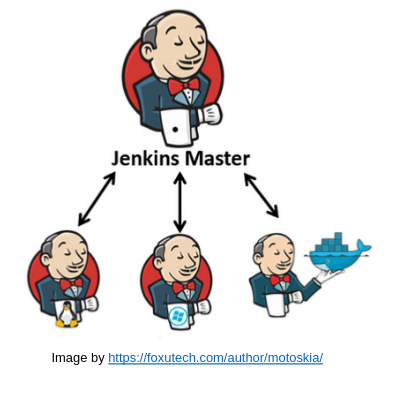
Let's configure an agent.
- In you Jenkins main Dashboard, go to Manage Jenkins > Nodes > New Node.
- Give your node a name:
agent1, and choose the Permanent Agent. - In Number of executors choose 1. This defines the number of concurrent pipelines that can run on the agent. Usually should be set to the number of cores on the machine the agents runs on.
- Under Remote root directory specify
/home/jenkins/agent(the directory on the agent where Jenkins will store files). - Assign a label to the agent, e.g.
general. The label will be later used to assign pipelines specifically on an agent having this label. - Keep all other default configurations and choose Save.
- On the Nodes page, find your newly created agent and click on it. You'll see the join secret the Jenkins agents has to have in order to authenticate in the Jenkins controller.
- Modify the
docker-compose.yamland the.envfile to launch an agent container:
services:
  jenkins:
    ...

+ agent1:
+     image: jenkins/inbound-agent:latest-jdk17
+     environment:
+       - JENKINS_URL=http://jenkins:8080
+       - JENKINS_AGENT_NAME=agent1
+       - JENKINS_AGENT_WORKDIR=/home/jenkins/agent
+       - JENKINS_SECRET=${JENKINS_SECRET}   # to be read from the .env file
+     networks:
+ - jenkins-net- In order to configure the
NetflixFrontendBuildpipeline to be running on your agent, instead on the Jenkins controller, modify thebuild.Jenkinsfileas follows:
pipeline {

-   agent any
+   agent {
+      label 'general'
+   }

    ...

}- Commit & push, verify the triggered pipeline is running on
agent1.
How can we use Docker within our pipelines which run themselves as a container?
It's not a good practice to run the Docker daemon inside a Docker container due to security and stability concerns.
Remember that Docker operates using a client-server model (the docker cli is the client, while the Docker Daemon is the server that performs the instructions).
Let's install in your Jenkins server the docker cli only, while using the Docker daemon of the host machine.
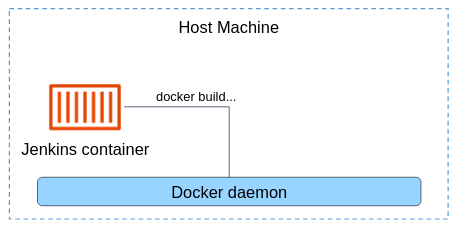
To use the host machine's Docker daemon, we have to build a custom Jenkins image with Docker CLI installed, and mount the Docker socket of the host machine.
The Dockerfile with docker CLI installation is already given to you under jenkins_docker/jenkins-agent.Dockerfile.
Modify your Docker Compose file as follows:
services:
  jenkins:
    ...

  agent1:
-     image: jenkins/inbound-agent:latest-jdk17
+     build:
+       context: .
+       dockerfile: jenkins-agent.Dockerfile
      environment:
        - JENKINS_URL=http://jenkins:8080
        - JENKINS_AGENT_NAME=agent1
        - JENKINS_AGENT_WORKDIR=/home/jenkins/agent
        - JENKINS_SECRET=${JENKINS_SECRET}   # to be read from the .env file
+     volumes:
+       - /var/run/docker.sock:/var/run/docker.sock
+     group_add:
+       - ${DOCKER_GROUP_ID}     # to be read from the .env file
      networks:
        - jenkins-net
Before running your compose project, add the DOCKER_GROUP_ID var to your .env file:
echo "DOCKER_GROUP_ID=$(getent group docker | cut -d ':' -f 3)" >> .envRe-build your pipeline and make sure it was completed successfully.
Create credentials in Jenkins to allow you to authenticate with GitHub for accessing repositories and managing webhooks.
- Kind must be Username and password.
- Choose informative Username (as github or something similar)
- The Password should be a GitHub Personal Access Token with the following scope:
Click here to create a token with this scope.
repo,read:user,user:email,write:repo_hook - Enter
githubas the credentials ID.
Create log recorder that track only INFO logs related to GitHub webhook.
com.cloudbees.jenkins.GitHubPushTrigger
org.jenkinsci.plugins.github.webhook.WebhookManager
com.cloudbees.jenkins.GitHubWebHook
- In Jenkins, create a text credentials.
- In Manage Jenkins, Configure System, configure the GitHub server to use the created credentials.
- Configure the token in GitHub webhook page.